ROCK STONE TUTORIAL
Tutorial by Philip Klevestav< Back to Material Tutorials Index page
INTRODUCTION
This is the second tutorial covering rougher stone materials, this time we will create a cliff wall. I highly recommend you to at least quickly read through some of the steps on the highpoly in the Rough Stone tutorial before reading this one as some similar steps are not described in the same detail in this tutorial.At the bottom you will see the end result and a download link to the .PSD file containing the texture files in this example.
I used Zbrush, 3DS Max and Photoshop for this example.
SEAMLESS TILING MATERIAL?
I added a new section where I go through some tips on howto make your mesh tilable. So if you intend to create a seamless tiling material of this read that section (right below the "HIGHPOLY" section).
HIGHPOLY
Just like the rough stone tutorial the base of the normal map will be created in Zbrush. The workflow will be very similar except this time around you will need to really work with a whole lot of depth and high intensity settings.I recommend using a matte material straight away in Zbrush so you will not be chocked by the actual depths you are going to need to use during this proceedure.
I basically started off using the "Mallet Fast" brush with "Free Hand" setting applied and a square Brush Alpha with soft edges.
When I have previously created rocks I have noticed that you will always have to try and have some kind of direction in your textures. This highly depends on what kind of rock wall you are trying to create. For cliffs they usually have a horizontal direction.
I bring this up because if you try to create a very deep rock texture while not having any major directions either vertically, horizontally or diagonal it will most likely turn out very weirdly looking. If you are to create a set of modular rocks it can be a good idea to try and keep a gradient of line direction in your rocks. For example start off with vertical lines at the bottom and gradually going into more cliff like rocks at the top.
For this one I chose a mainly horizontal direction since it will be a cliff wall.
I just keep dragging lines on top of each other with the Mallet Fast tool, both ZAdd and ZSub, try to use pretty soft motions when dragging the lines to avoid too much jagginess in the lines.
Sometimes you may need to smooth out some areas and iterate on those with more brush strokes (you can smooth out areas using shift+click, or if you are in ZSub mode it is alt+shift+click).
I used a high Z Intensity and a pretty low Focal Shift on my brush to keep it quite sharp.
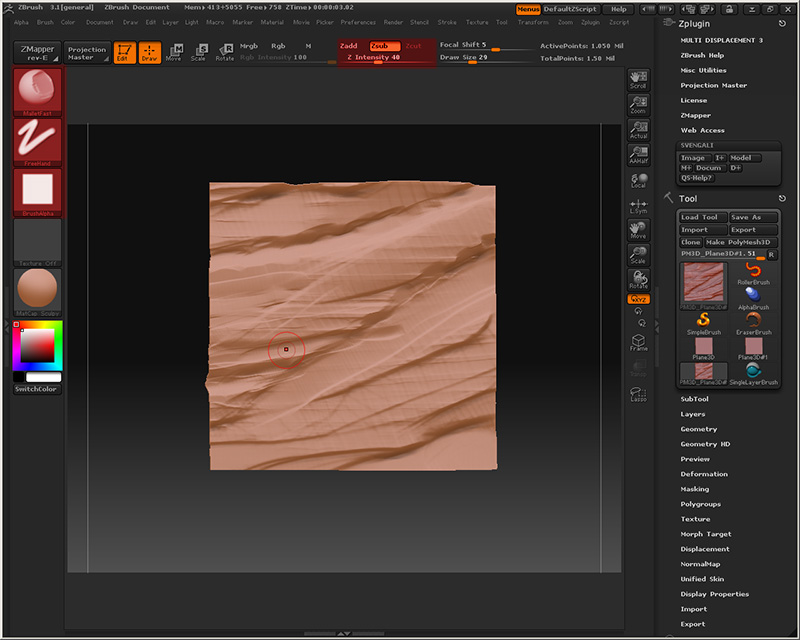
Here is the result after a few more minutes
I started defining the edges of the cracks a little here, just using the Mallet Fast brush still with the same settings only dragging subtle short brush strokes vertically on the horizontal edges where I want some uneven areas.

After a couple of more minutes, some cracks are more defined now and edges are more uneven, I also used the "Layer Brush" somewhat to push out/in larger sections quickly.
This will probably do for a base, so I will export this to an .OBJ file.
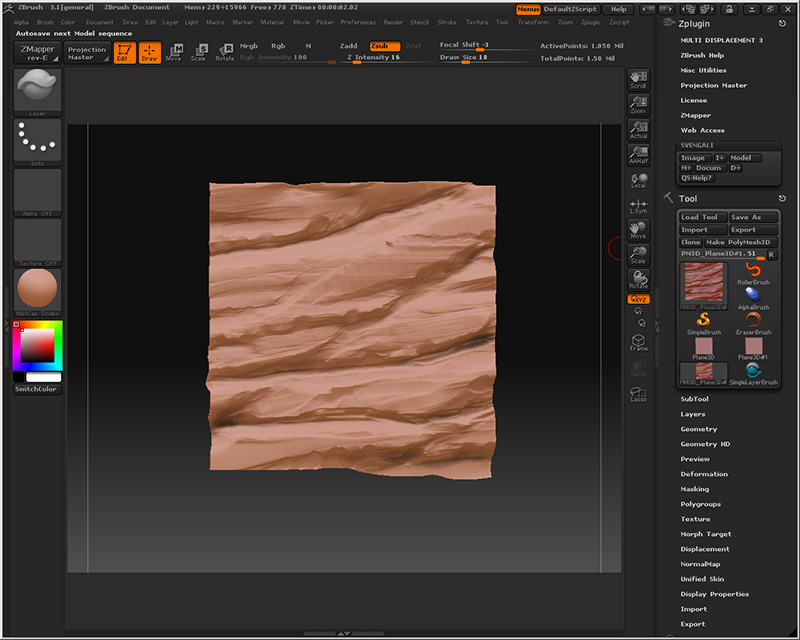
And import that into 3DS Max, and just like the rough stone tutorial I extrude the border edges of the highpoly. This time I should get a decent Ambient Occlusion bake from the highpoly as well because of the depth.
I usually bake out all maps in double the size I want to work with to get rid of some artifacts when shrinking it to the work size. This is highly individual, some prefer to always render out and work in the same resolution, and that can save some time as well in the baking process.

SEAMLESS TILING
This is an addition to this tutorial. I regret I did not make the example in this tutorial seamlessly tilable from the start. So here I created a new one using the same steps as above with an exception when it comes to working on the borders of your mesh.First of all, this is ONE way you can make your texture tilable, there are many other ways of doing this.
In Zbrush you can work with separate mesh parts on the canvas and offset the canvas right away in Zbrush (~ key), however this requires that you exit "Edit" mode in Zbrush (a bit like flattening all layers in Photoshop), there is an great tutorial on this workflow by Nick Marks you can see it here.
Another way is to export a displacement map from Zbrush: "Tool > Displacement > Create Displacement Map" (1), the result then appears in the "Alpha" button (2) which you can click and choose "Export". Offset the displacement map in Photoshop and clone/copy away the seams and save this the file again, load up a highly tesselated plane in Zbrush and apply the displacement map ("Apply DispMap") on your plane (3).
There is also a tutorial that goes in on this subject a bit, but using Mudbox, by Sascha Henrichs. You can see the tutorial here.

This is however the way we will do it in this tutorial, it is not perfect, but you will have an editable mesh to work with at all times.
To begin with, start with an empty plane, just like above, however here I want to add some "border guides" to know where I need to connect my lines. To do this easily go to "Transform > Acivate Symmetry", and you will be using either "X" or "Y" symmetry on. You can toggle the symmetry on or off by using the "X" key, sadly I don not know if there is any shortkeys for toggling X or Y symmetry on and off.
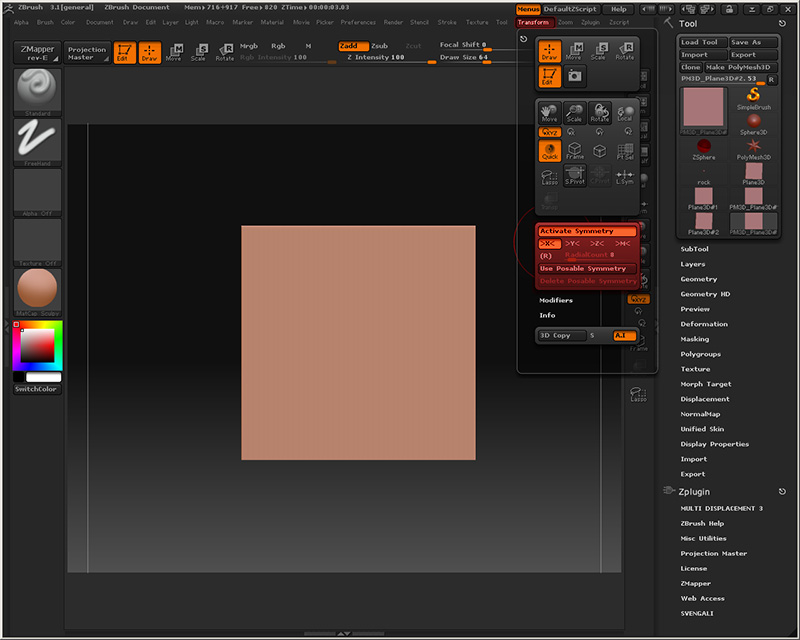
Now, while having "X" or "Y" symmetry ON, I paint out a couple of help strokes among the border, try to not go too far towards the center as you will get some ugly symetrical details in your material then. When you feel you have enough guides to create the amount of defined lines in your material we can move on to the next step.
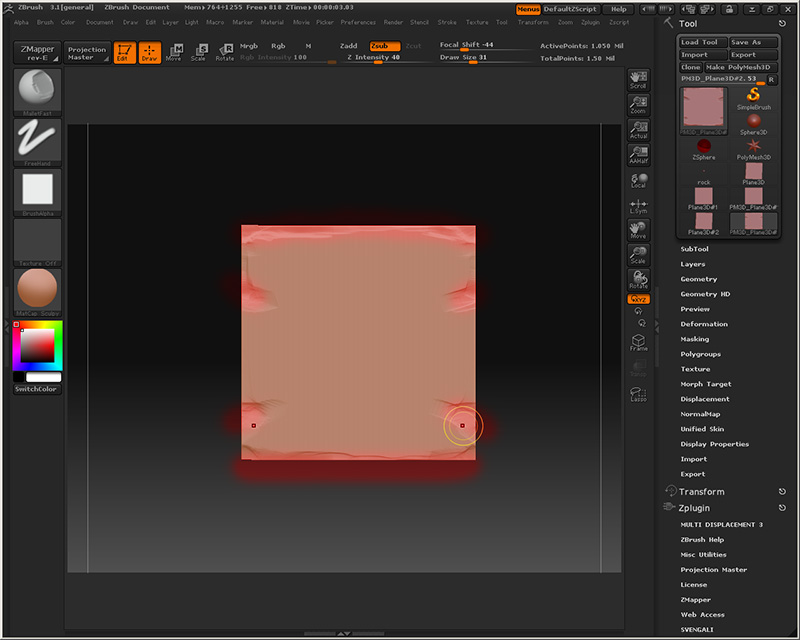
After a few minutes using the steps in the beginning of this tutorial I will end up the same way, but now having a tilable material. The only thing you need to think about is whenever you get close to a border, just toggle the symmetry on and draw a few short strokes at the very end.
But do not go too crazy using the symmetry, no matter how precise you do this you will get a small seam when baked out for sure, so it will not be 100% correct, that being said it is no big deal if you draw a few strokes without having symmetery activated around the borders.
The far most important thing here is to have the MAIN lines connected across the borders. So it is really just the border help strokes we drew previously that you have to keep in mind, what you do with the rest of the mesh does not really matter.
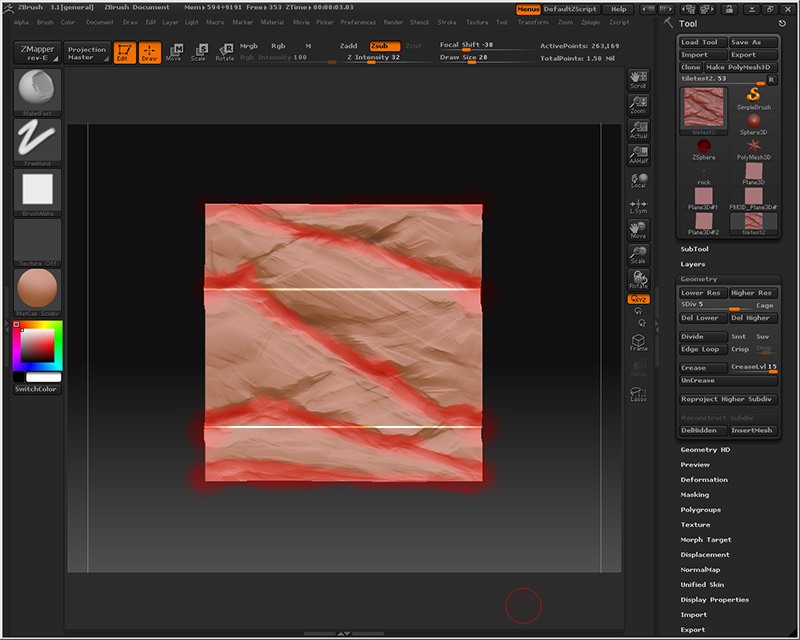
Here is what I got baked out from the highpoly. You can see I got a small seam (top left) that I simply clone away (bottom right), this seam is so thin you will get away with a slightly different cloning result in the baked out ambient occlusion, in fact, most of the detail in the ambient occlusion around the seam will be white or almost white anyway.
You can also notice some details look a bit too symmetrical when seen next to each other like this, you can easily alter those a bit with a somewhat sharp brush and a low opacity in Photoshop. Still do not go over board since you will want to have the information in the ambient occlusion and the normal map as identical as possible.
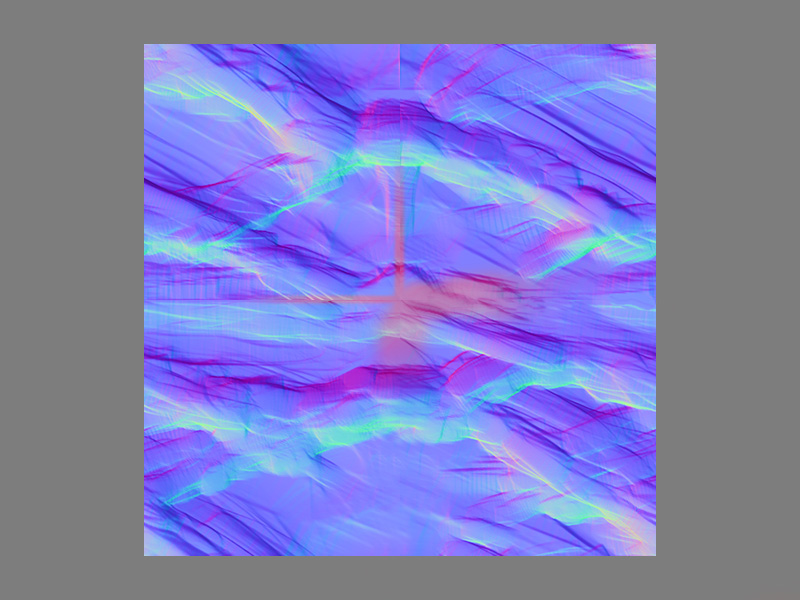
Here is my result tiled four times when I cloned away the thin seams in the bakes.
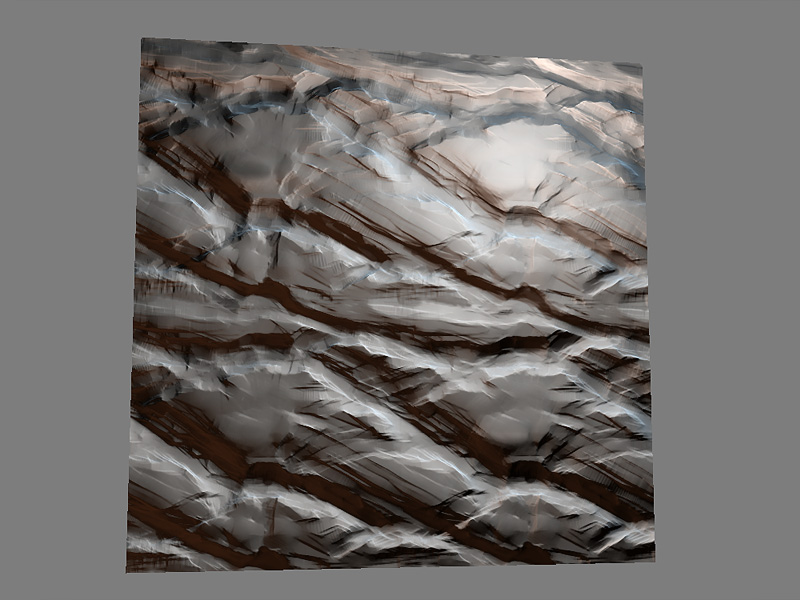
TEXTURE MAPS
Here are two basic materials from photos, somewhat edited (I tend to use smart and/or surface blur in Photoshop and then fade the result to get rid of some noise in photos) to be used as a foundation for the diffuse texture and overlays for the normal map.
The normal map overlays extracted from the materials in the image above above. Make sure these are seamless if you are to create a seamlessly tiling material.

The ambient occlusion from the highpoly bake and the blue channel from the final normal map but inverted can make for some powerful masks for the diffuse, specular and glossiness maps, espcially if manipulated a bit.
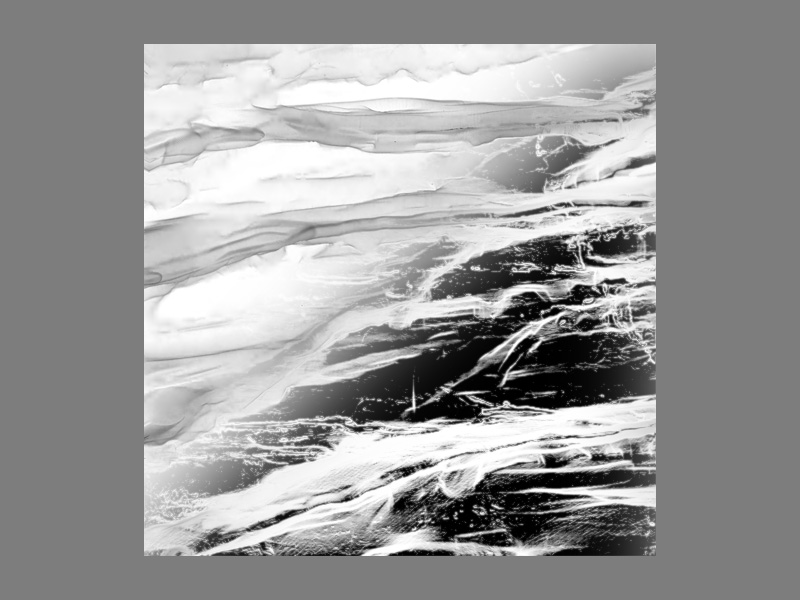
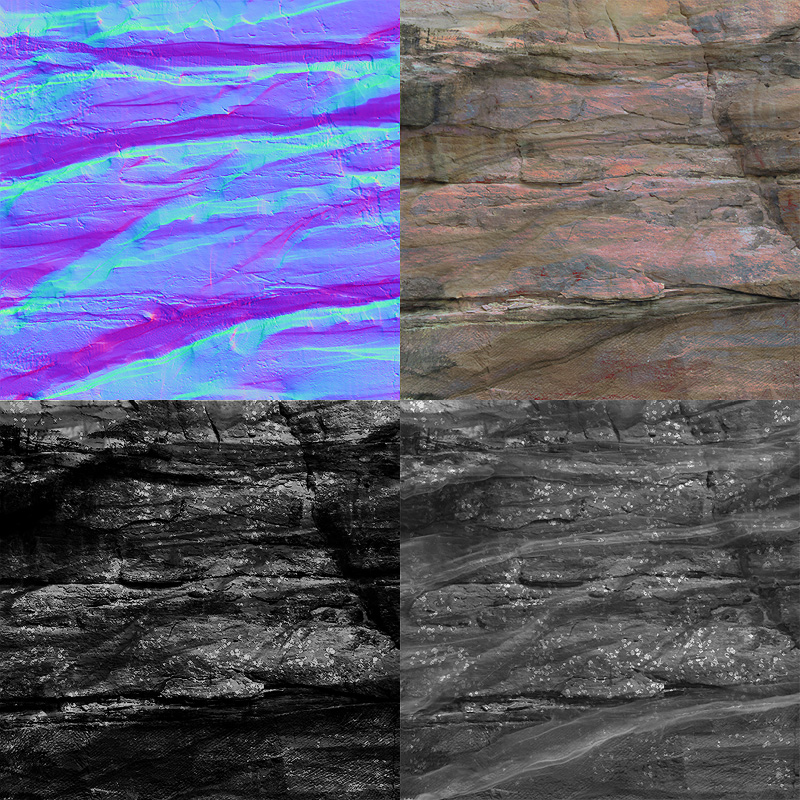
The final texture maps:
For the normal map at the top left I overlayed the high/mid frequency details I made in photoshop. I also made a layer where I color picked and hand painted and filled in some of the deeper angles. This is very easy and can really improve the normal map a lot. I have made quite a few normal maps basically only handpainting the colors and picking from a rendered out normal map palette. It may not be mathematicly correct a lot of times but it can be really useful, especially when working with more organic/rough shapes or simple things that only requires straight lines.
The diffuse, in the top right, is mixed with layer masks which were made with the Color Select tool, the normal map's blue channel, the ambient occlusion bake and hand edited/painted.
I wanted to add a mix of colors, trying to keep it to a red and blue theme. This is easily achieved with layers on top of each other and using layer masks of different kinds and various blending modes. A lot of times the layer mask is a lot more important than the acutal layer information (which sometimes may just be a plain color).
The specular in bottom left is highly contrasted and has some white dots overlayed. The ambient occlusion could be used for more masking here or simply darkening the cracks if that is a look you are after.
At the bottom right is the Glossiness map. It is pretty decontrasted but features some variation with dots and some darker spots. Still important to never go down to black. This one could easily be darker to get a more matte look on the stone.
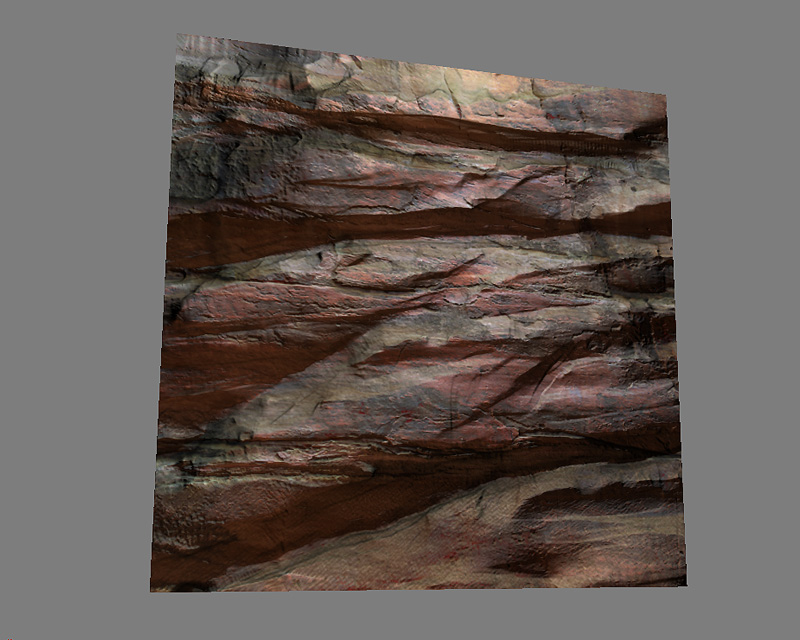
The end result with all maps applied.
Download the .PSD
< Back to Material Tutorials Index page